The whole model, apart from the figures, was constructed from wooden tongue depressors, a cardboard tube and dowels. The swing chairs were made with wood, glitter cord to simulate the chains, wire hangers and metal crimps, all from a bead shop.
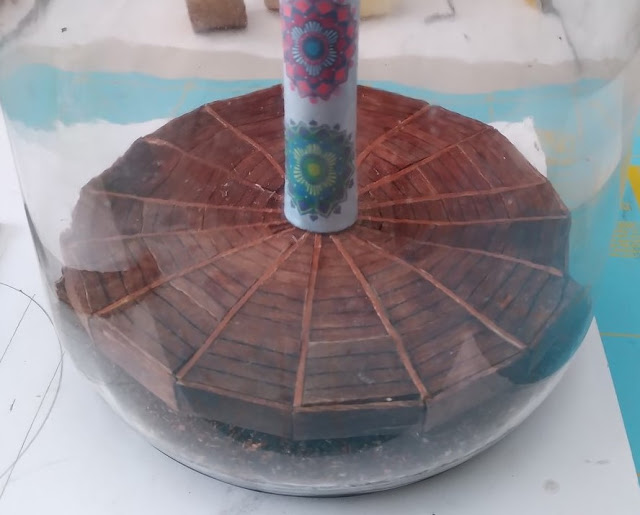
THE BASE PLATFORM
After
installing the first base design in the bottle, I was not happy with it. I went
to buy another 1 gallon bottle, only to find that they were discontinued, so I
managed to break the first base out and re-use the bottle.
I
re-designed the base and was pleased with the result after successfully
inserting it into the bottle.
I designed
it to rotate on a centre bearing as I hope to eventually rotate it with a servo
from an rc model, modified to run continuously.
The bearing
carrier and its bearing were inserted in the bottle and glued to the base.
Resin was
poured inside the bottle and rooibos tea leaves were sprinkled over the resin
before it cured. This formed the “ground”.
The platform
outriggers were then glue in place.
The centre
column (cardboard tube), was now prepared to accept the primary canopy frames.
It was
covered with 160gm card printed with a pattern.
The figures
were now made from plastic toy soldiers, modified by cutting off all the army
stuff and repositioning the arms and legs with superglue and bicarbonate of
soda.
The figures were now painted with acrylic paint.
The seats
were made from the tongue depressors and the “chains” were attached to the
seats and crimped together to form loops at the top for mounting on the wire
hangers.
The “passengers”
were then glued to their seats.
The canopy
primary and secondary frames were now made. The primary frames had the metal
hangers attached.
The primary
frames were each fitted with their swings and inserted into the bottle and
glued into place.
When all
eight primary frames were glued in place, the secondary frames were fitted.
The covering pieces for the canopy
were printed on 160gm card, cut out, test fitted and then glued in place on the
top of canopy frames.
The centre shaft was now extended with dowel and tube, covered with patterned paper and the top prepared for the motor.
I modified a servo to run continuously by removing the control circuit board
and potentiometer, cutting off the travel stop on the final gear wheel and
connecting a 1.5v battery directly to the motor. I made a housing for the servo
and battery from some scrap plastic and wired it through 2 brass contacts which
operate the motor when the housing is pressed together.


No comments:
Post a Comment