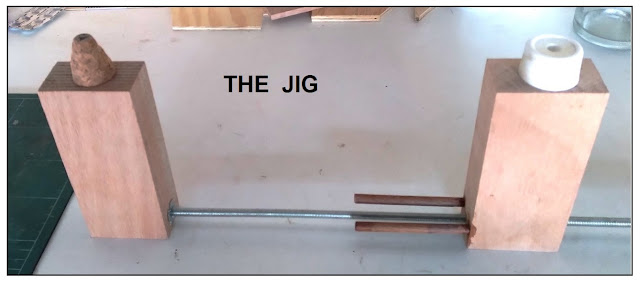
I like to scale my models so as to completely fill the bottle if possible, so I needed an accurate measurement of my bottle’s outside profile. I found that hand drawing around its shape was inaccurate so I came up with this jig. After drawing the bottle shape using the jig, all I had to do was scan it into MS Paint or Paint.net and superimpose a drawing of the model over it and scale the model to fit, reducing it by 12mm(10+2) in height to allow for an average thickness of 5mm for the bottle walls + 2mm clearance. (The exact thickness can be calculated using my internal diameter gauge).
Parts list.
1 x 10mm
peice of plywood or similar, approx 100 x 140mm.
2 x wooden end blocks, approx. 40 x 70 x
150mm.
1 x length of 10mm threaded rod, approx 600mm
long.
1 x 10mm wingnut and washer.
2 x 10mm threaded inserts (these are optional).
2 x 8mm dowels x 100mm long.
1 x
large cork and 1 x rubber door stop.
Draw a line at 60° on the plywood plate as shown in Fig
1. Cut the plate into two at this line. Cut the corner off the left hand piece
1 as shown in Fig 2.
Using a pen with a replaceable ink cartridge (Biro or
Bic or similar), place it against this piece so that the point of the pen lines
up with the bottom edge of the plate (Fig 2). Tack this in place with dabs of thick
superglue (Fig 3).
Cut the corner off piece 2 as shown in fig 6 and mark a line down the
centre of the edge as shown (Fig 4), using a marker pen. Chamfer the edge of
this piece to the line with sandpaper or a plane as shown in Fig 5, but do not
sand away the line.
Now place piece 2 against the pen so that it lines up with the point of
the pen as shown in Fig 6 and then tack it to the pen with dabs of thick
superglue.
When set, fill the gap between the pieces and the pen with 5 minute epoxy, one side at a time, then cover over
with a couple of wooden tongue depressors (Fig 7).
Get the 2 wooden end blocks and drill 10mm holes right through in each
as shown in Fig 8a.
In one block, mark a bottle curvature as shown in Fig 8b and drill 2 x
8mm holes to a depth of 10mm as shown. Temporarily insert the 10mm rod in the
centre hole and glue in the 8mm dowels parallel to the rod (Fig 8c).
In the other end block, you can either fit 10mm inserts at each end of
the hole to hold the threaded rod or just glue the rod in place with 5 minute
epoxy.
Insert a suitable nail or panel pin through the centre
of the cork so that the point projects 2mm at the large end. Trim to length and
glue (Fig 9a).
Shape the cork as
shown in Fig 9b.
Underneath each of the
two end blocks, glue a piece of 180 grit sandpaper with pva glue. This will
stop the jig moving on the paper whilst you trace the bottle.
Assemble the jig as
shown (Fig 10).
Put the cork in the neck of the bottle and rest the bottle on the 8mm
dowels. Hold the door stop against the base of the bottle and close the jig so
that the point of the cork is pressed into the front end block. Press the two
end blocks against the bottle and tighten the wing nut on the threaded rod.
Pick up the jig and bottle and lay it over a suitable piece of paper on
which you will trace the bottle outline.
Hole the pen holder vertically and at right angles to the bottle whilst
gently hold the bottle in place and trace its outline.
Various shaped vessels
from small to over 5 litres can be traced with this jig.
Example from MS Paint
/ Paint.net


No comments:
Post a Comment